
ساخت اپلیکیشن ذکرشمار
فیلم ساخت اپلیکیشن ذکرشمار
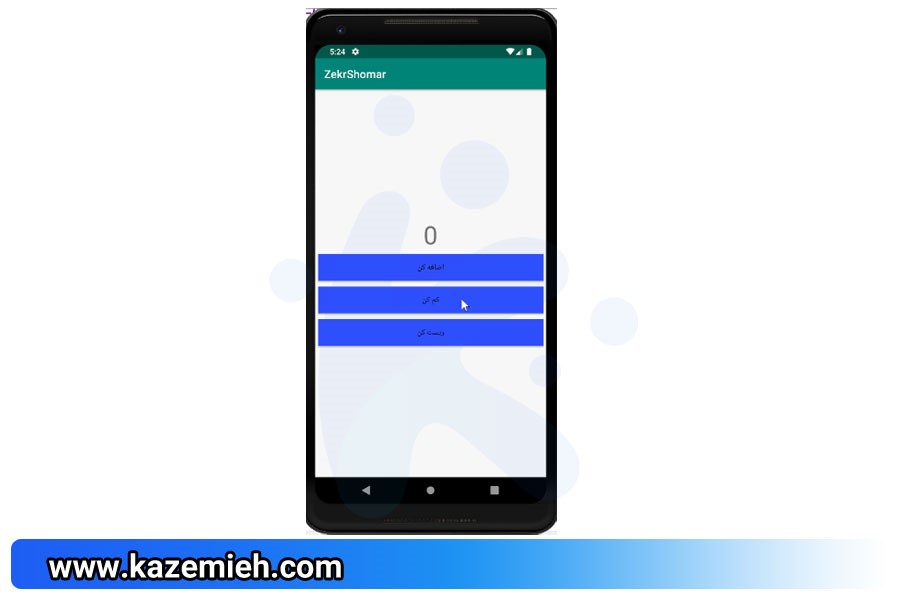
متن به همراه عکس آشنایی با ساخت اپلیکیشن ذکرشمار
در این مقالهی آموزشی میخواهیم با نحوه ساخت اپ ذکرشمار و کاربرد آن آشنا شویم.
اپ ذکر شمار برنامه ای است که با کلیک کردن روی دکمههای موجود در آن میتوانیم مقدار عدد 0 را که به صورت پیشفرض قراردادهایم اضافه، کم و یا ریست کنیم.
انتخاب گزینهی ” اضافه کن ” در اپ ذکرشمار:
برای این کار ابتدا باید یک پروژه بسازیم.
سپس مراحل زیر را طی میکنیم:
Res>layout>activity_main.xml
وقتی وارد activity_main میشویم، به صورت پیشفرض یک TextView وجود دارد که آن را پاک میکنیم. برای راحتی کار نوع لایه را به LinearLayout تغییر میدهیم.
سپس کدها را به صورت زیر مینویسیم:
|
1 2 3 4 5 6 7 8 9 10 11 12 13 14 15 16 17 18 19 20 21 22 |
<?xml version="1.0" encoding="utf-8"?> <LinearLayout xmlns:android="http://schemas.android.com/apk/res/android" xmlns:app="http://schemas.android.com/apk/res-auto" xmlns:tools="http://schemas.android.com/tools" android:layout_width="match_parent" android:layout_height="match_parent" android:orientation="vertical" tools:context=".MainActivity"> <TextView android:id="@+id/tv_MainActivity_plus" android:layout_width="wrap_content" android:layout_height="wrap_content" android:text="0" /> <Button android:id="@+id/b_MainActivity_plus" android:layout_width="wrap_content" android:layout_height="wrap_content" android:text="اضافه کن" /> </LinearLayout> |
توضیح کدها :
_ در خط 2 (LinearLayout) را میسازیم.
_ در خط 10 (TextView) را ایجاد میکنیم.
_ برای TextView در خط 11 یک آیدی (ID) درنظر میگیریم. (tv به معنای TextView)
_ در خط 14 عدد 0 را به عنوان پیشفرض قرار میدهیم.
_ در خط 16 یک (Buttom) ایجاد میکنیم.
_ در خط 17 برای Button آیدی(b به معنای Button) درنظر میگیریم.
با استفاده از این کدها قسمت گرافیکی کار را تکمیل کردیم و در مرحلهی بعد برای انجام کدها مراحل مربوط به جاوا را انجام میدهیم.
App>Java>com.kazemieh.www.zekrshomar>MainActivity
|
1 2 3 4 5 6 7 8 9 10 11 12 13 14 15 16 17 18 19 20 21 22 23 24 25 26 27 28 29 |
package com.kazemieh.www.zekrshomar; import androidx.appcompat.app.AppCompatActivity; import android.os.Bundle; import android.view.View; import android.widget.Button; import android.widget.TextView; public class MainActivity extends AppCompatActivity { int i=0; @Override protected void onCreate(Bundle savedInstanceState) { super.onCreate(savedInstanceState); setContentView(R.layout.activity_main); final TextView tv_plus=findViewById(R.id.tv_MainActivity_plus); Button b_plus=findViewById(R.id.b_MainActivity_plus); b_plus.setOnClickListener(new View.OnClickListener() { @Override public void onClick(View view) { i++; tv_plus.setText(i+""); } }); } } |
توضیح کدها:
_ در خط 18 اولین کاری که میکنیم این است که TextView را تعریف میکنیم، سپس با قسمت گرافیکی کار ارتباط را برقرار میکنیم.
_ در خط 19 Button را تعریف میکنیم.
_ در خط 21 به Button خاصیت کلیک میدهیم. در این قسمت ویژگی افزایش عدد پیش فرض(عدد 0) و نشان دادن آن را نیز اضافه میکنیم.
نکته:
داخل TextView فقط میتوانیم مقدار String قرار بدهیم و فقط String نمایش داده میشود، امادر اینجا چیزی که برای نمایش قرار دادیم عدد است. برای اینکه این مشکل حل شود، یک “+” در کنار i قرار میدهیم و یک دابل کوتیشن ” ” باز میکنیم.
گزینهی Run را کلیک میکنیم و پروژه را اجرا میکنیم.
در مرحلهی بعد وارد قسمت گرافیکی کار میشویم و کدنویسی زیر را انجام میدهیم:
|
1 2 3 4 5 6 7 8 9 10 11 12 13 14 15 16 17 18 19 20 21 22 23 24 25 26 27 |
<?xml version="1.0" encoding="utf-8"?> <LinearLayout xmlns:android="http://schemas.android.com/apk/res/android" xmlns:app="http://schemas.android.com/apk/res-auto" xmlns:tools="http://schemas.android.com/tools" android:layout_width="match_parent" android:layout_height="match_parent" android:layout_gravity="center" android:gravity="center" android:orientation="vertical" tools:context=".MainActivity"> <TextView android:id="@+id/tv_MainActivity_plus" android:layout_width="wrap_content" android:layout_height="wrap_content" android:textSize="45sp" android:text="0" /> <Button android:id="@+id/b_MainActivity_plus" android:layout_width="match_parent" android:layout_margin="5dp" android:layout_height="wrap_content" android:background="@color/colorAccent" android:text="اضافه کن" /> </LinearLayout> |
توضیح کدها:
_ تغییراتی را در خطهای 7 _8_13_20 انجام میدهیم.
_ برای قشنگی کار در خط 24 به Button رنگ اضافه میکنیم.
_ در خط 16 اندازهی متن TextView را نیز میتوانیم تغییر دهیم.
پس از انجام کدنویسیهای قسمت بالا گزینهی Run را کلیک کرده و تغییرات لازم در پروژه را مشاهده میکنیم.
انتخاب گزینهی ” کم کن ” در اپ ذکرشمار:
در مرحلهی بعد میخواهیم یک دکمه برای کم کردن عدد پیش فرض به پروژهمان اضافه کنیم.
برای این کار وارد قسمت گرافیکی میشویم و یک Button جدید اضافه میکنیم و به صورت زیر کدنویسی را انجام میدهیم:
|
1 2 3 4 5 6 7 8 9 10 11 12 13 14 15 16 17 18 19 20 21 22 23 24 25 26 27 28 29 30 31 32 33 34 |
<?xml version="1.0" encoding="utf-8"?> <LinearLayout xmlns:android="http://schemas.android.com/apk/res/android" xmlns:app="http://schemas.android.com/apk/res-auto" xmlns:tools="http://schemas.android.com/tools" android:layout_width="match_parent" android:layout_height="match_parent" android:layout_gravity="center" android:gravity="center" android:orientation="vertical" tools:context=".MainActivity"> <TextView android:id="@+id/tv_MainActivity_plus" android:layout_width="wrap_content" android:layout_height="wrap_content" android:textSize="45sp" android:text="0" /> <Button android:id="@+id/b_MainActivity_plus" android:layout_width="match_parent" android:layout_margin="5dp" android:layout_height="wrap_content" android:background="@color/colorAccent" android:text="اضافه کن" /> <Button android:layout_width="match_parent" android:layout_height="wrap_content" android:id="@+id/b_MainActivity_mines" android:layout_margin="5dp" android:text="کم کن" android:background="@color/colorAccent"/> </LinearLayout> |
توضیح کدهای اضافه شده:
_ در خط 30 برای Button اضافه شده یک ID درنظر میگیریم.
_ در خط 31 و 22 layout_margin را اضافه میکنیم تا بین دو گزینهی ” کم کن ” و ” اضافه کن ” در پروژهمان فاصله اضافه شود.
_ در خط 32 متن “کم کن” را اضافه میکنیم.
_ در خط 33 رنگ را اضافه میکنیم.
حال به قسمت جاوا میرویم و کدنویسی این مرحله را نیز انجام میدهیم:
|
1 2 3 4 5 6 7 8 9 10 11 12 13 14 15 16 17 18 19 20 21 22 23 24 25 26 27 28 29 30 31 32 33 34 35 36 37 38 39 40 41 |
package com.kazemieh.www.zekrshomar; import androidx.appcompat.app.AppCompatActivity; import android.os.Bundle; import android.view.View; import android.widget.Button; import android.widget.TextView; public class MainActivity extends AppCompatActivity { int i=0; @Override protected void onCreate(Bundle savedInstanceState) { super.onCreate(savedInstanceState); setContentView(R.layout.activity_main); final TextView tv_plus=findViewById(R.id.tv_MainActivity_plus); Button b_plus=findViewById(R.id.b_MainActivity_plus); b_plus.setOnClickListener(new View.OnClickListener() { @Override public void onClick(View view) { i++; tv_plus.setText(i+""); } }); Button b_mines=findViewById(R.id.b_MainActivity_mines); b_mines.setOnClickListener(new View.OnClickListener() { @Override public void onClick(View view) { if (i>0){ i--; tv_plus.setText(i+""); } } }); } } |
توضیح کدهای اضافه شده:
_ در خط 28 Button اضافه شده را تعریف میکنیم.
_ در خط 30 خاصیت کلیک باتن (Button) منفی را اضافه میکنیم.
_ در خط 33 شرظی را ایجاد میکنیم تا اعداد منفی را نشان ندهد.
_ در خط 35 در کنار i از ” – ” و دابل کوتیشن” ” نیز استفاده میکنیم تا TextView مقدار عدد را نشان دهد.
_ گزینهی Run را انتخاب میکنیم تا پروژه اجرا شود.
انتخاب گزینهی ” ریست کن ” در اپ ذکرشمار:
حال میخواهیم گزینهی ریست (Rest) را اضافه کنیم تا با کلیک کردن روی آن، عدد هرچیزی که بود تبدیل به 0 شود.
کدنویسی مربوط به این بخش در قسمت گرافیکی را به صورت زیر انجام میهیم:
|
1 2 3 4 5 6 7 8 9 10 11 12 13 14 15 16 17 18 19 20 21 22 23 24 25 26 27 28 29 30 31 32 33 34 35 36 37 38 39 40 41 42 43 |
<?xml version="1.0" encoding="utf-8"?> <LinearLayout xmlns:android="http://schemas.android.com/apk/res/android" xmlns:app="http://schemas.android.com/apk/res-auto" xmlns:tools="http://schemas.android.com/tools" android:layout_width="match_parent" android:layout_height="match_parent" android:layout_gravity="center" android:gravity="center" android:orientation="vertical" tools:context=".MainActivity"> <TextView android:id="@+id/tv_MainActivity_plus" android:layout_width="wrap_content" android:layout_height="wrap_content" android:textSize="45sp" android:text="0" /> <Button android:id="@+id/b_MainActivity_plus" android:layout_width="match_parent" android:layout_margin="5dp" android:layout_height="wrap_content" android:background="@color/colorAccent" android:text="اضافه کن" /> <Button android:layout_width="match_parent" android:layout_height="wrap_content" android:id="@+id/b_MainActivity_mines" android:layout_margin="5dp" android:text="کم کن" android:background="@color/colorAccent"/> <Button android:layout_width="match_parent" android:layout_height="wrap_content" android:id="@+id/b_MainActivity_rest" android:background="@color/colorAccent" android:layout_margin="5dp" android:text="ریست کن"/> </LinearLayout> |
توضیح کدهای اضافه شده:
_ در خط 35 یک Button اضافه میکنیم.
_ در خط 38 ID مربوط به Button را اضافه میکنیم.
_ در خط 39 رنگ را اضافه میکنیم.
_ در خط 40 layout_margin را اضافه میکنیم.
_ در خط 41 متن مربوط به Button را اضافه میکنیم.
در بخش جاوا نیز کدهای مربوط به Button جدید را اضافه میکنیم:
|
1 2 3 4 5 6 7 8 9 10 11 12 13 14 15 16 17 18 19 20 21 22 23 24 25 26 27 28 29 30 31 32 33 34 35 36 37 38 39 40 41 42 43 44 45 46 47 48 49 50 51 52 |
package com.kazemieh.www.zekrshomar; import androidx.appcompat.app.AppCompatActivity; import android.os.Bundle; import android.view.View; import android.widget.Button; import android.widget.TextView; public class MainActivity extends AppCompatActivity { int i=0; @Override protected void onCreate(Bundle savedInstanceState) { super.onCreate(savedInstanceState); setContentView(R.layout.activity_main); final TextView tv_plus=findViewById(R.id.tv_MainActivity_plus); Button b_plus=findViewById(R.id.b_MainActivity_plus); b_plus.setOnClickListener(new View.OnClickListener() { @Override public void onClick(View view) { i++; tv_plus.setText(i+""); } }); Button b_mines=findViewById(R.id.b_MainActivity_mines); b_mines.setOnClickListener(new View.OnClickListener() { @Override public void onClick(View view) { if (i>0){ i--; tv_plus.setText(i+""); } } }); Button b_reset=findViewById(R.id.b_MainActivity_rest); b_reset.setOnClickListener(new View.OnClickListener() { @Override public void onClick(View view) { i=0; tv_plus.setText(i+""); } }); } } |
توضیح کدهای اضافه شده:
_ در خط 40 برای Button جدید را تعریف میکنیم.
_ در خط 42 خاصیت کلیک را اضافه میکنیم.
_ در خط 45 ویژگی ریست کردن را تعریف میکنیم.
_ در آخر گزینهی Run را انتخاب میکنیم و پروژه اجرا میشود.
اجرای پروژه:
دانلود فایل
مطالب زیر را حتما بخوانید
-

نحوهی کار با ویدئوپلیر (Video Player) از طریق پوشهی raw
7.42k بازدید
-

آلرت دیالوگ (AlertDialog) چیست و نحوهی کار با آن چگونه است؟
7.02k بازدید
-

اسنکبار (Snackbar) در اندروید
4.56k بازدید
-

ّFloating action Button (فلوتینگ اکشن باتن) در اندروید
4.4k بازدید
-

نحوهی کار با فریم لیوت (FrameLayout)
4.83k بازدید
-

یک روش برای تمرکز در برنامهنویسی
3.27k بازدید
2 دیدگاه
به گفتگوی ما بپیوندید و دیدگاه خود را با ما در میان بگذارید.
سلام خسته نباشید ، امکان انجام پروژه های اندروید استادیو را دارید؟
پروژه من همان ذکر شمار هست ولی با امکانات و ویژگیهای متفاوت که در فیلم شما نبود
سلام و درود بله به شماره بالای سایت در تلگرام پیام بدهید